2. Building and Running the UFS-HTF
The Unified Forecast System (UFS) Hierarchical Testing Framework (HTF) provides a platform for users to design/add/run their own testing cases. Once the HTF is built, users can follow the instruction/examples to configure and add test cases based on the concept of HIERARCHICAL SYSTEM DEVELOPMENT (HSD).
This chapter walks users through how to build and run one of the test cases from Case Studies for the UFS Weather Model.
Attention
Currently The prototype of UFS-HTF is based on the global-workflow, and it has been only tested on Orion. The steps described in this chapter will work only on Orion. This chapter can also serve as a starting point for running the UFS-HTF on other systems (including generic Linux/Mac systems), but the user will need to perform additional troubleshooting (e.g. installation of Spack-Stack, WIP).
2.1. Install the Spack-Stack
Attention
Skip the Spack-Stack installation if working on a Level 1 system (e.g. Orion).
2.1.1. Background
The UFS-HTF draws on over 50 code libraries to run its applications. These libraries range from libraries developed in-house at NOAA (e.g., NCEPLIBS, FMS) to libraries developed by NOAA’s partners (e.g., PIO, ESMF) to truly third party libraries (e.g., NETCDF). Individual installation of these libraries is not practical, so the Spack-Stack was developed as a central installation system to ensure that the infrastructure environment across multiple platforms is as similar as possible. Installation of the Spack-Stack is required to run the UFS-HTF.
2.1.2. Instructions
For a detailed description of installation options, see Installing the Spack-Stack.
After completing installation, continue to the next section (Section 2.2: Download the UFS-HTF prototype).
2.2. Download the UFS-HTF prototype
The UFS-HTF prototype source code is publicly available on GitHub. To download the HTF code, clone the doc branch of the repository:
git clone --recurse-submodules -b doc https://github.com/clouden90/ufs-htf.git
2.3. Build the UFS-HTF Using CMake
In the ufs-htf directory, create a subdirectory to hold the build’s executables:
cd ufs-htf
mkdir build
cd build
From the build directory, run the following commands to build the testing platform:
cmake ..
make -j 2
2.4. Example Test Cases
Insipred by Case Studies for the UFS Weather Model, we implemented one of the test cases (2019 Hurricane Barry) for ufs coupled model setup (S2S, S2SW, and S2SWA WIP). Currently the UFS-HTF supports nine tests as shown in Table 2.1. Users who plan to design/add a new test should refer to Adding test for details on how to do so. At a minimum, these users will need to add the new test case to the ufs-htf/test/CMakeLists.txt script and add the corresponding files in the ufs-htf/test folder.
Test Number |
Test Name |
Test Description |
|---|---|---|
Test #1 |
build_ufs |
build ufs model and its utilities |
Test #2 |
get_ufs_fix_data |
stage model input data from AWS S3 bucket |
Test #3 |
ATM_c96_Barry |
C96 grid atm only Hurricane Barry run |
Test #4 |
S2S_c96_Barry |
C96 grid atm-ocn-ice Hurricane Barry run |
Test #5 |
S2SW_c96_Barry |
C96 grid atm-ocn-ice-wav Hurricane Barry run |
Test #6 |
S2SWA_c96_Barry |
C96 grid atm-ocn-ice-wav-aerosal Hurricane Barry run |
Test #7 |
Barry_track_err |
Hurricane Barry track error check |
Test #8 |
model_vrfy |
Comparsion between fcst tmp2m/tmpsfc and reanalysis |
Test #9 |
fcst_only_S2S_c96_Barry |
Same as Test #4 without using Rocoto Workflow Manager |
2.5. Running Test Cases
Following Section 2.3, you can first check the list of test cases with:
cd <build-directory>/test
ctest -N
This will list all available tests in the test suite:
Test #1: build_ufs
Test #2: get_ufs_fix_data
Test #3: ATM_c96_Barry
Test #4: S2S_c96_Barry
Test #5: S2SW_c96_Barry
Test #6: S2SWA_c96_Barry
Test #7: Barry_track_err
Test #8: model_vrfy
Test #9: fcst_only_S2S_c96_Barry
Then you can run tests with:
ctest
This will run all tests in the test suite. This can take a while so be patient. When the tests are complete, ctest will print out a summary. For example:
Test project /work2/noaa/epic-ps/ycteng/case/20220828/ufs-htf/build/test
    Start 1: build_ufs
1/9 Test #1: build_ufs ........................   Passed  907.80 sec
    Start 2: get_ufs_fix_data
2/9 Test #2: get_ufs_fix_data .................   Passed    0.08 sec
    Start 3: ATM_c96_Barry
3/9 Test #3: ATM_c96_Barry ....................   Passed  1226.49 sec
    Start 4: S2S_c96_Barry
4/9 Test #4: S2S_c96_Barry ....................   Passed  1273.41 sec
    Start 5: S2SW_c96_Barry
5/9 Test #5: S2SW_c96_Barry ...................   Passed  1329.12 sec
    Start 6: S2SWA_c96_Barry
6/9 Test #6: S2SWA_c96_Barry ..................   Passed  1771.19 sec
    Start 7: Barry_track_err
7/9 Test #7: Barry_track_err ..................   Passed   28.91 sec
    Start 8: model_vrfy
8/9 Test #8: model_vrfy .......................   Passed   66.50 sec
    Start 9: fcst_only_S2S_c96_Barry
9/9 Test #9: fcst_only_S2S_c96_Barry ..........   Passed  821.40 sec

100% tests passed, 0 tests failed out of 9

Total Test time (real) = 7424.93 sec
If you want to run a single test or a subset of tests, you can do this with the -R option, for example:
ctest -R S2S_c96_Barry # run a single test
ctest -R S2S* # run a subset of tests
The output from these tests (stdout) will be printed to the screen but, to allow for greater scrutiny, it will also be written to the file LastTest.log in the directory <build-directory>/Testing/Temporary. In that same directory you will also find a file called LastTestsFailed.log that lists the last tests that failed. This may be from the last time you ran ctest or, if all those tests passed, it may be from a previous invocation.
If you’re not happy with the information in LastTest.log and you want to know more, you can ask ctest to be verbose
ctest -V -R S2S_c96_Barry
…or even extra-verbose (hypercaffeinated mode):
ctest -VV -R S2S_c96_Barry
The -V and even -VV display the output messages on the screen in addition to writing them to the LastTest.log file. However, sometimes the amount of information written to LastTest.log isn’t much different than if you were to run ctest without these options, particularly if all the tests pass.
You can also display the output messages only for the failed tests by using --output-on-failure
ctest --output-on-failure
Then You can check error messages for the failed tests, figure out the issue and fix it.
ctest also has an option to only re-run the tests that failed last time:
ctest --rerun-failed
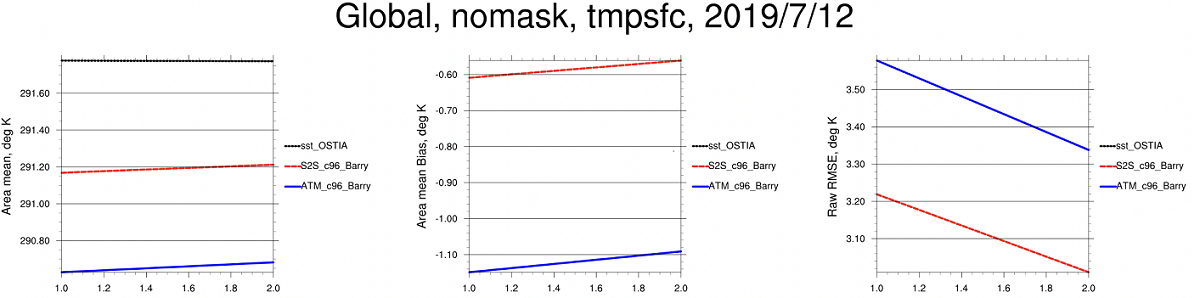
You can also check <build-directory>/test/*.png to examine the modeled results from test cases. Here is one of the example plots (surface temperature comparsion: atm-only vs s2s vs OSTIA) generated from test #7:
Surface temperature timeseries comparison